How to Edit PDF Documents Part Two: Using Adobe Creative Suite to edit a PDF file

Not knowing how to edit PDF files in a design studio will be a real drawback. Studios often have to edit PDF documents in order to alter a document created by someone else, or to make a last minute change without having to return to the source files. This page explains how to make more complex changes to text and objects using Adobe Creative Suite.
The best way to edit a PDF file (without actually recreating it from the source files) is by using a combination of Acrobat, Illustrator and Photoshop, depending on what you need to do. If you only have Adobe Acrobat your options will be limited, but you can still make simple text and layout changes. To find out more, go to the tutorial on How to Edit PDF Documents Part One: Using Adobe Acrobat to edit PDF files.
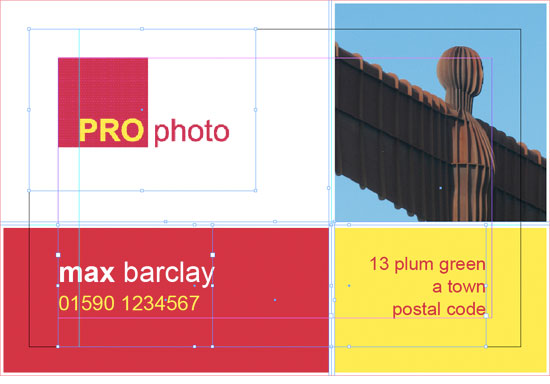
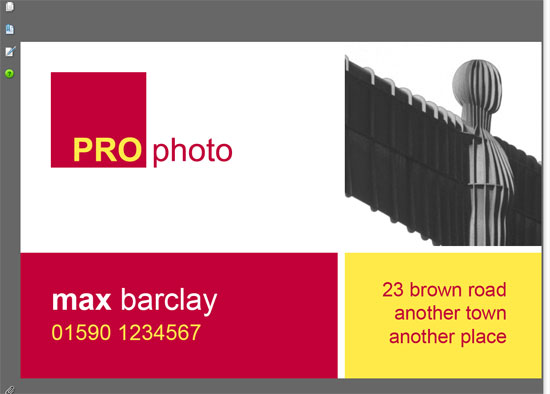
As explained in the previous article, below is an example of a simple business card created (and opened) in InDesign. All the elements on the page have been selected to give you an idea of how it is constructed. The logo (top left) is an Illustrator EPS file with the text converted to outlines. The image on the right is a 300 DPI CMYK TIFF file saved in Photoshop, and the remaining text has been placed in two separate text boxes. The red and yellow background boxes and white lines have been created and placed in InDesign. In short, this is a fairly typical, simple layout.
If you want to know how to edit PDF files using Acrobat's Advanced Editing Tools (prior to Acrobat X, for Advanced, read Simple), check out How to Edit PDFs Part One: Using Adobe Acrobat to edit PDF files. The rest of this page will focus on how to edit PDF files in Photoshop and with the help of the remainder of the Creative Suite. Acrobat accesses Illustrator and Photoshop and uses them as super-advanced plug-ins. When you edit an element within a PDF file, Acrobat determines which program will be best to use as the editor, and it calls it up.
How to Edit PDF in Illustrator
Using Adobe Illustrator to Edit Text Direct From Acrobat (9 or earlier)
If you need to change more than one word or line of text in a PDF file, you'll run into trouble if you are just using Acrobat's built-in Advanced Editing Tools (TOOLS/ADVANCED EDITING) unless you're using Adobe Acrobat X Pro. Otherwise, the best thing to do is to edit the elements using Illustrator, accessed from Acrobat (9 or earlier). To do this, open your PDF file. From the Advanced Tools palette, select TOUCHUP OBJECT TOOL. Without selecting any individual item, right-click anywhere on the page (or on the paste board). A dropdown menu will appear. Select EDIT PAGE... If this option doesn't appear, make sure you haven't accidentally selected anything on the page - and try again.
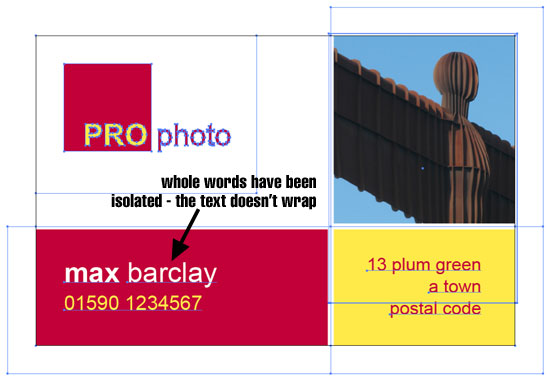
When you select EDIT PAGE, all elements will be selected automatically and a new temporary file will be opened in Adobe Illustrator. Before making any changes, take a look at how everything is laid out. Use Illustrator's Direct Selection Tool and drag around everything on the page. The first thing to note is that the text is not conveniently arranged in text box blocks. Whole words (and often individual letters) have been isolated, making it impossible to 'select all' using the type tool:
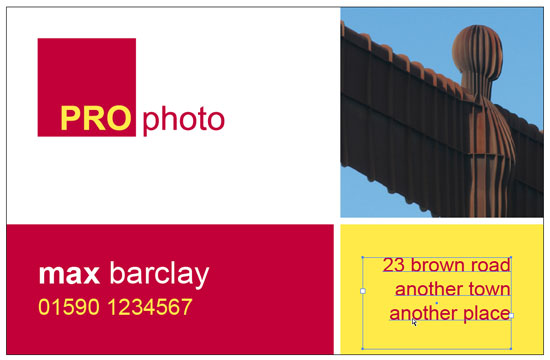
This means that the best way to replace the text is to delete the old and add the new in a wrapping text box. But you need to make sure you're using the same font and attributes. For example, let's say you want to edit the address (bottom right). To do this, select Illustrator's Type Tool and select some text from the first line (in this case, 'plum green').
Copy the text, drag/create a new empty text box on the paste board and paste the text into it. This is just to retain the style. Now type (or paste using plain text) the revised address over the top. Use the Direct Selection Tool to delete the old text. Please note that if you use the black Selection Tool instead, you'll end up deleting everything on the page instead of individual elements.
Position the new text box appropriately:
You can now select FILE/SAVE and close the temporary file. When you return to Acrobat, you'll see that the changes have been adopted. You can also change the typeface, and when you return to Acrobat the new face will appear in the embedded fonts list (FILE/PROPERTIES/Fonts Tab). Obviously, whilst in Illustrator you can edit any other elements in the same session if you need to.
If you have any doubts at all about the integrity of the fonts, convert them to outlines before saving the temporary file and returning to Acrobat (TYPE/CREATE OUTLINES). Please note, however, that if you want to make further edits to the text this will no longer be possible if they have been converted to paths in this way. Make sure you make a copy of the original PDF file before altering it.
If you want to edit the photo in the PDF file, you'll need Photoshop.
How to Edit PDF in Photoshop
Using Adobe Photoshop to Edit Images Direct From Acrobat (9 or earlier)
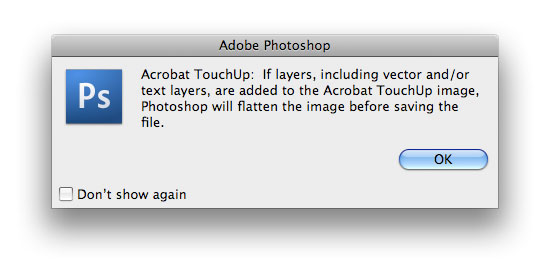
To edit images from within Acrobat, open the PDF file. Select the TOUCHUP OBJECT TOOL and right-click on the image you want to alter. Select EDIT IMAGE... A warning will appear about flattening images:
And then the image will open in Photoshop:
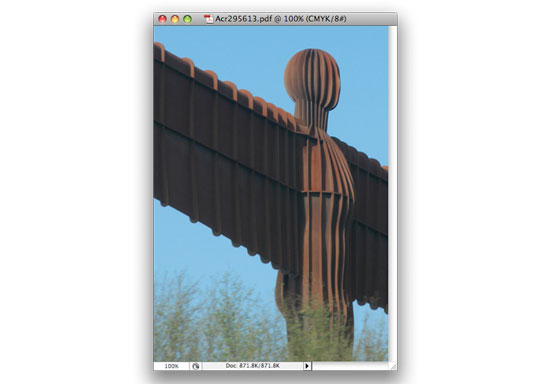
Don't change the size or shape of the image - just make the alterations using the existing settings. Let's say for example I want to convert the image to Grayscale from CMYK. To get good results, the best way to do this in CS3 is to use the Black & White option under IMAGE/ADJUSTMENTS. This is only available under IMAGE/ADJUSTMENTS/BLACK & WHITE and play with the sliders until I'm happy. Next I convert it to Grayscale (IMAGE/MODE/RGB COLOR).RGB color mode though, so first I'll need to convert the image to RGB (IMAGE/MODE/RGB COLOR). Then I'll select
Now select FILE/SAVE (not SAVE AS...) and close the image. The changes are adopted by the PDF file in Acrobat, which you can now save and close.
These are the most common and useful methods of editing a PDF file, other than actually recreating the document from scratch. For simpler editing within Adobe Acrobat, see How to Edit PDF Documents Part One: Edit PDFs Using Adobe Acrobat.
Resources & More Information
- Adobe Acrobat X Pro - this includes just Acrobat X Pro, but with all the editing functionality
- Click to go to top of How to Edit PDF Files page