Create a Photoshop Cut Out Without Using a Clipping Path
Use Layers to Create a Photoshop Cut Out for InDesign
The are lots of ways to skin a cat. I use several different methods to create Photoshop cutouts, depending on the job in hand. Often, a simple clipping path will do the job (click here to find the best and worst ways to create a clipping path cutout). But sometimes a subtler approach is required. Basic clipping paths are fine, but if you need to have part of the image blend into the background in any way, it'll just look horrible.
In recent years Photoshop and Indesign have started to work much better together, and you can now import a Photoshop PSD file directly into InDesign, transparency and all. This approach 'cuts out the middle man' by doing away with the necessity of creating a flattened EPS file containing postscript clipping path information.
When working on any image file in our studio, we always, always keep a layered Photoshop PSD (or Illustrator AI) file for amendments, and a flattened TIFF or EPS file for placing. Then, if any amendments need to be made, we delete the flat file and work on the layered file which still contains all vector, textual and transparency information. When the changes have been made we create a new flattened file for placement. This is a 'non-destructive' way of working.
However, using the following method we only need one file - the PSD file - which we can keep as an editable document and also place within InDesign as is. Just remember that it should be in CMYK color mode at 300 DPI if your document is for print, just like any other image.
So how do you create a layered Photoshop cut out?
I maintain that the best way to create a perfect Photoshop cut out is by hand, using the Photoshop Pen Tool. Whatever kind of cutout you want to end up with, this is still the best way to start. If you want to know the best way to create a cutout in this way, read the article Photoshop Clipping Paths - The Best and Worst Ways to Create Image Cutouts and then return here!
So now you've created the perfect path, this is where the procedure differs from the process of creating a clipping path. With your image open, press the COMMAND key (on an Apple Mac, or the control key on a PC) and in the Paths Palette click on the path you've just created. A selection will be made of your path.
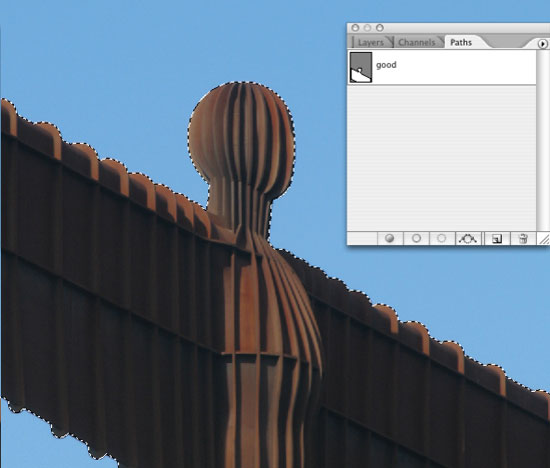
Now from the main menu, select Layer/New/Layer Via Copy. A new layer containing your cutout will appear in the layers palette. Now hide the background layer (don't delete it - remember we're working non-destructively). You'll be left with the cutout on a transparent background. Now (with the new layer selected) click the Add Layer Mask button at the bottom of the palette. Select the Erase tool and choose a large brush with soft edges. With the new layer mask selected, erase some of the image. We're using a mask rather than erasing the actual image because... you guessed it! We're working non-destructively. You should end up with something like this:

Now save the image as a Photoshop PSD file and import it into InDesign. You'll see that the transparency imports right along with it. To test the theory, place a flat image in the background and place the Photoshop cut out image over the top. It'll blend into whatever is placed behind it.
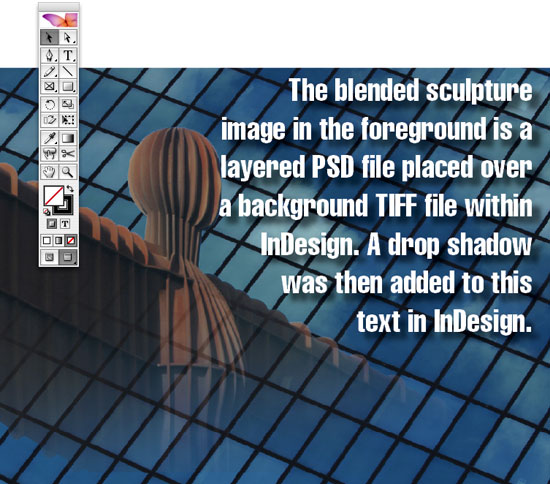
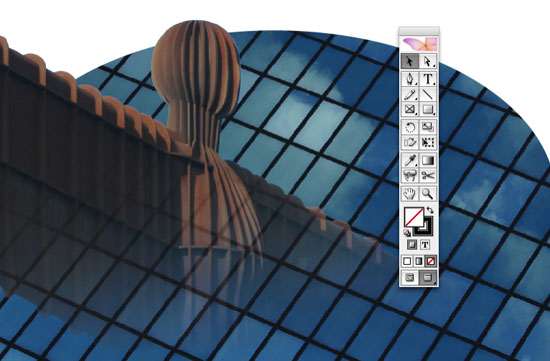
This technique is great if you want to have vector information behind the blending top image, but in front of the background (as above). You'll save all that time otherwise spent opening, changing, flattening and saving large Photoshop montage images. This method is also useful if you want the top image to 'break out' of the image beneath - like so:
So that's how to create a Photoshop cut out without the use of a clipping path. If you want to use a clipping path instead, click here for another Photoshop Cut Out article.
Resources & More Information
- Photoshop Clipping Paths
- Free Method of Converting Quark to InDesign
- 4 Color Process Printing and Spot Color Printing - What's the Difference?
- Return from Photoshop Cut Out to Home