Adobe Illustrator How to Prepare a Vector Image for Press
When using Adobe Illustrator how to create a press-ready vector image is the first and most fundamental lesson to learn if designing for print. The capabilities of Adobe Illustrator have, in recent years, become more and more complex. The results you can achieve are amazing, but the basic rules stay the same. Whether you want to create a graphic for four color process print or for spot color print, you have to set up your swatches correctly and save the file in an appropriate format.
Not so long ago, it was impossible or impractical to import a vector graphic into a layout program like Quark XPress unless it was saved as an EPS file. Now you can also import AI files (Illustrator's native format) and PDF files with safe results - and InDesign is even more versatile and forgiving than Quark.
Adobe Illustrator How to
Adobe Illustrator How to work non-destructively
However, (in my studio at least), good practice is to keep an original 'working' AI file, containing all layers, type information etc. When it comes to creating a press-ready graphic for placement in Quark or InDesign, we convert all the text to paths (or outlines), merge all layers and save the file as an EPS. We do the same with Photoshop (PSD) files. We always keep an original layered file, including all type information and adjustment layers so we can come back and alter it at a later date (if we need to). We flatten the image and save it as either a TIFF or a Photoshop EPS file for placement.
This method of working is 'non-destructive'. We can always return to amend the original image without having to recreate it from scratch. If you work 'destructively' by flattening a working file you effectively destroy all the editable layers when you flatten the image or rasterise type.
In summary, you'll end up with two files - an AI editable file and a flattened EPS file for placement. If you work in this way you'll always know to return to the AI for editing - and then to overwrite the EPS file for placement - never return to edit the EPS file.
Adobe Illustrator How to
Adobe Illustrator How to create a basic logo - learn by doing
The best way to learn any software is by doing. Set yourself a task and then see it through. You'll come up against obtacles that will force you to find a solution - and this is how you learn. That's why actual work experience is so valuable, and highly prized by prospective graphic design employers.
If you need help to solve any issue that the built-in help can't solve, type the problem into Google, and chances are you'll find a helpful forum to sort it out. Remember - you won't be the first person to experience even the most obscure issue - you'll always find a forum answer which has been left in response to someone else's query, and which will solve your own.
Below is a simple exercise that'll take you through the basics of setting up a logo in Illustrator and preparing it for spot color printing. You'll then convert it for process color printing. Check out the InDesign basics exercise to take the next step, and prepare a business card from document setup to press-ready artwork.
I'm not going to get into design theory here - there are many sources of information and inspiration which you can draw on while you improve your design skills. I'm going to assume that you already have a good eye for design; perfection comes with experience and practice. I'm just going to look at the more technical details of setting up a press-ready vector shape design.
Adobe Illustrator How to
Adobe Illustrator How to create a two color vector logo
We'll make up a photographer's logo for our excercise. This is an extremely basic exercise, but the procedures are exactly the same for any project, no matter how complex a graphic you're creating. First create a new document in Illustrator (File/New...). It doesn't matter about the physical document size - the vector graphic is resolution-independent and will scale to any size without losing quality. I usually start with the default A4 size.
Give the document a name and make sure the color mode is set to CMYK (use RGB color mode for web graphics). An A4 portrait page (or landscape page if you chose it) will show on the screen. The area surrounding the page is known as the 'pasteboard'.
First create the spot color version...
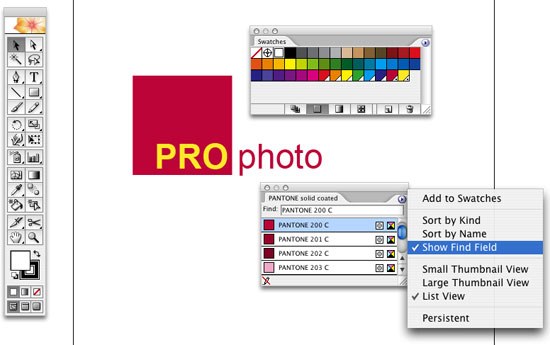
Select the text tool from the tool bar, click on the page and type PROphoto. Set the word 'PRO' to Arial Bold and 'photo' to Arial Regular using the Character palette. Create a square with the rectangle tool. Make it a perfect square by holding down the shift key while you drag to size the graphic - this will constrain it's proportions. Pressing shift to constrain proportions, or position on the x / y axis, is a universal funtion that works in the same way within most, if not all, graphic design creation and layout software packages.
Send the square to the back by selecting it using the selection tool, and going to Object/Arrange/Send to Back. Position the square by eye so you'll end up with the 'PRO' text positioned bottom right. If you need to adjust the kerning to increase the space between the 'O' and small 'p' of 'photo', add a space between the letters. Select the space with the text tool, open the Character palette and either increase or reduce the tracking in the Character palette until you're happy.

Open the Pantone swatch palette (window/swatch libraries/Pantone solid coated). The little submenu at the top right corner of the swatch palette will enable you to view in list view and show a search field. I've already decided to use Pantone 200 (red) and Pantone 107 (yellow) so type 200 into the search field. Pantone 200 will show up - click on it and a new swatch will automatically appear in the color swatches palette. The little square swatch has a gray triangle bottom right which indicates that it's a global color. Within the triangle is a little black dot, indicating that it's a spot color.
Now type 107 into the search field and you'll grab your second swatch in the same way. Close the Pantone swatch palette.
Select the 'PRO' text with the text tool and click on the Pantone 107 swatch in your swatches palette. Then select the 'photo' text and click on the Pantone 200 swatch to color it red. Finally select the square with the selection tool and click on the Pantone 200 red swatch again.
You have your logo!
Adobe Illustrator How to
Adobe Illustrator How to save the working file
This will be your AI working file, so save it as PROphoto_Logo.ai. Notice that I use underscores instead of spaces in file names. This is a hangover from years of worrying about PC compatibility, so I still do it - you can have spaces if you want. Best practice is to keep the file name short but clear just in case you need to search through endless archives for it in years to come.
Adobe Illustrator How to
Adobe Illustrator How to save the EPS file
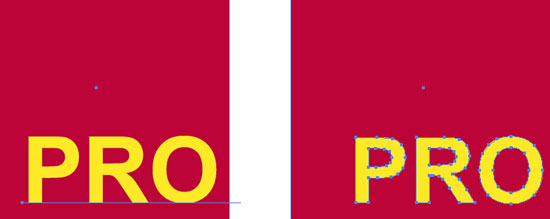
Now that it's saved you'll create a press-ready EPS file for placing. First, convert text to outlines to eliminate potential font problems later on, or if you need to e-mail the EPS file to a printer for any reason. Go Select/Select All (it doesn't matter if the square is selected at the same time). Go Type/Create Outlines. The text will become outlined and will no longer be editable as text (see the image below). Save the file as an Illustrator EPS file. You can retain the same name as before - the suffix EPS will ensure that the original AI version is not overwritten.

You've just created a press-ready, two spot color logo!
Now create the 4-color process (CMYK) version
Let's say we want to create a version for four color process printing for brochures or advertising usage. Keep the EPS version open. Double click on one of the Pantone swatches in the main swatches palette. Check the preview box. Where it says Color Mode, click the popup menu and change the selection to CMYK - then click on the Color Type popup and select Process Color. With the preview box checked, you might see a subtle change in the colors on-screen. Check and uncheck the preview box a few times to see what I mean. In print, this variation will be more obvious - the colors will appear less vibrant because they will no longer be a solid blob of ink, but an area of approximate color made up by lots of cyan, magenta, yellow and black dots.
Click OK. Now perform the same ritual with the second spot color. You'll see that the little black dots in the corners of the swatch squares (in the Swatches palette) will have disappeared. Save the EPS file as ProPhoto_Logo_CMYK.eps
You've just created a four color process, press-ready vector graphic. No need to worry about resolution with these images. Now you're ready to place the graphic in an InDesign or Quark XPress document.
Resources & More Information
- Adobe Illustrator CC
- 4 Color Process Printing and Spot Color Printing - What's the Difference?
- InDesign Files - How to Set Up Business Card Layout Design for Press
- Return from Adobe Illustrator How to Prepare a Vector... to Home