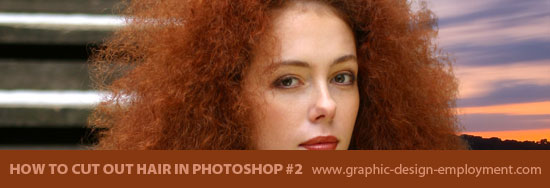
How to Cut Out Hair in Photoshop
Below is a tutorial on how to cut out hair in Photoshop using (mainly) a combination of Replace Color, Levels and the Blending Options Menu. You can either read on, or view the Photoshop video tutorial (in 2 parts) below.
How to Cut Out Hair in Photoshop - Tutorial
Video Tutorial Part 1
How to Cut Out Hair in Photoshop - Tutorial
Video Tutorial Part 2
Every image has useful attributes and nightmarish obstacles...
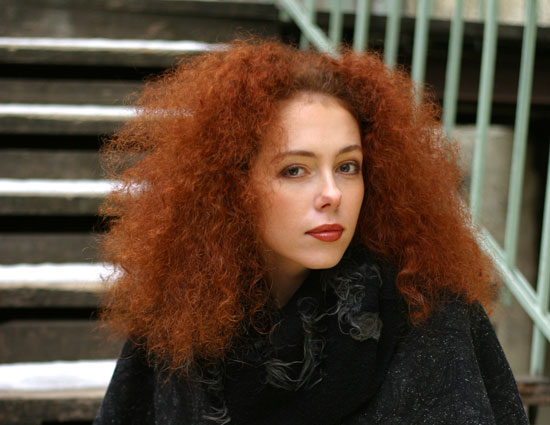
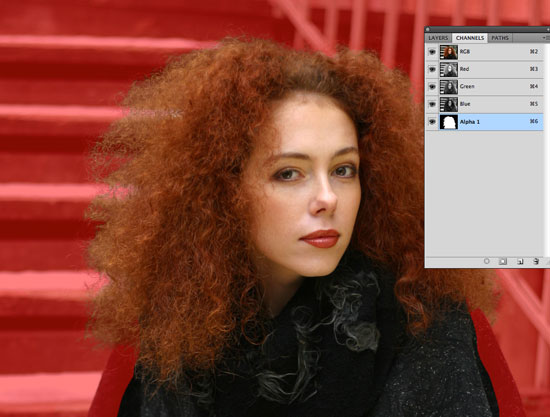
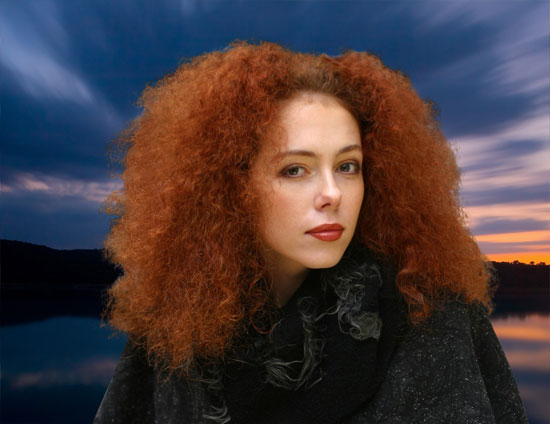
The image featured in this article (below) has two main things working against me - the steps in the background (which have white strips shooting into the subject's head on the left) and the upright railings on the right. This is not a nice background to work with. Secondly, the hair itself is fine, frizzy and very complex around the edges. Hmmm.
The good news...
In my favor is, of course, the hair color. It should be quite straight forward to create an effective mask which starkly contrasts the foreground from the background.
First, select an image to work with
Before you get started, if you want to use the same image as I've used, you can download it from the free photos section at stock image library, Dreamstime. Just type 1132795 into the Free Images search field. Alternatively, choose one of your own images. If you need a suitable image to work on, here are a bunch of hair images from Dreamstime.
How to Cut Out Hair in Photoshop - Tutorial
Get started
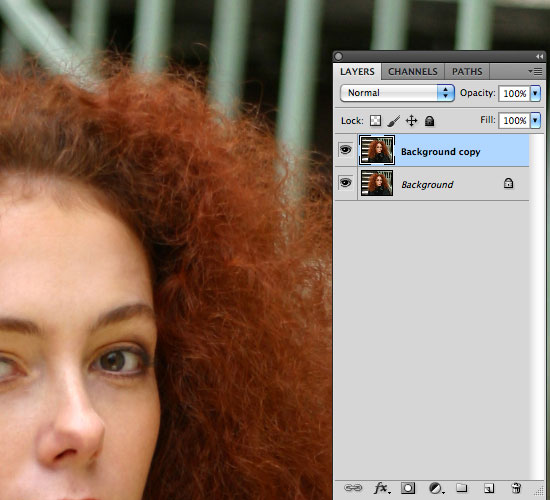
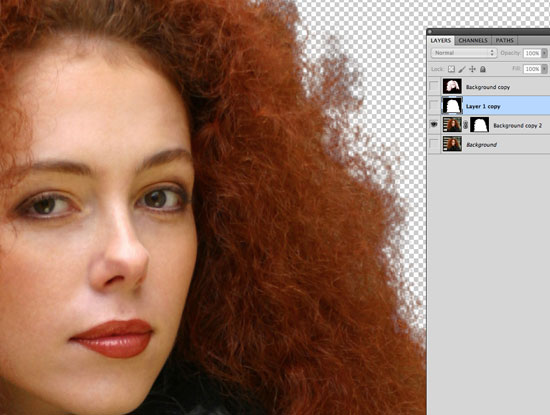
I like to work non-destructively - which means to say I always keep copies of any work in progress, source files, layers and channels. Then it's easy to revert to an earlier incarnation without resorting to the History palette (which only works in a single session - not in saved files). For Mac users, Apple's OSX Lion promises to change all this with the introduction of 'Versions', but at the time of writing, Lion has been released but Adobe has not yet adopted its new features.
Duplicate the background layer
In any event, it's always best to be cautious. So to begin with, (and making sure you're working in RGB Color Mode) duplicate the Background Layer (below). You may decide to create several copies now, or duplicate the Background whenever you need a new copy as you proceed - entirely your call. I make copies as I go along. To do this, drag the background layer over the Create a New Layer button at the bottom of the palette. Alternatively, right-click on the layer and select Duplicate Layer... whatever's your pleasure.
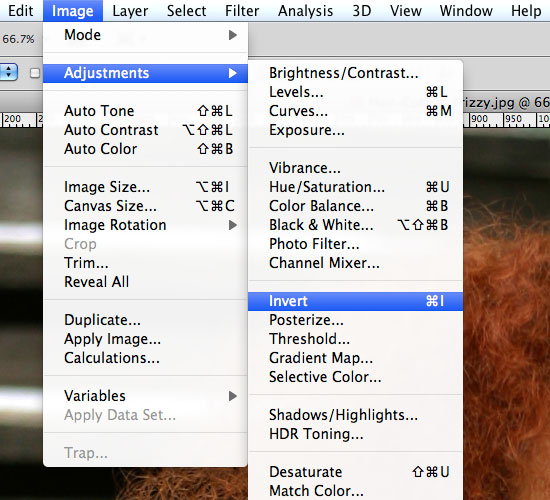
Invert the top layer
Next we're going to invert the new top layer so that it looks like the 'blue lady' below. To do this, click on the top layer and select Image/Adjustments/Invert. The purpose of this and the ensuing steps is to increase the distinction between the hair and the background as much as possible without degrading the image and fine detail too much - so bear with me.

Select Color Blend Mode for top layer & duplicate the background layer
With the top still selected, locate the Blending Mode dropdown menu at the top of the Layers palette. Select Color from the menu so that the image becomes a positive again, as shown below. We then need to duplicate the background layer again so that we can merge the background copy with the top layer (below).
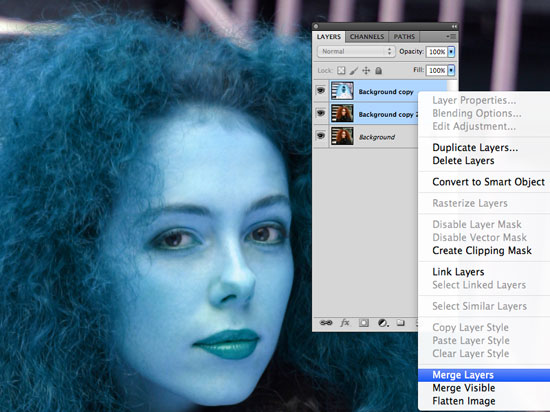
Select both the top and newly created middle layers, right-click on them and select Merge Layers.
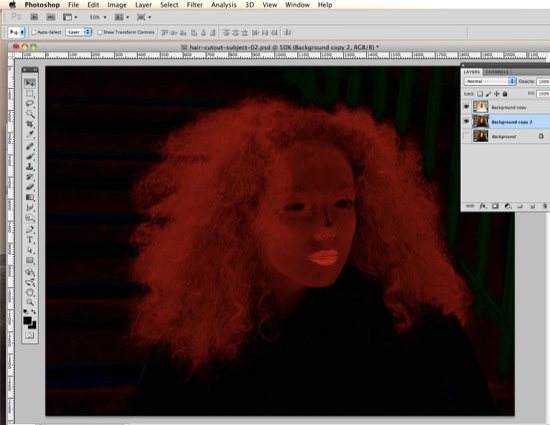
Invert the merged layers, then select Linear Burn Blend Mode for the top layer
This is where it starts to get freaky. Invert the layer you just created from the merge (Image/Adjustments/Invert) and select Linear Burn from the Blending Mode dropdown. You should end up with something like this:
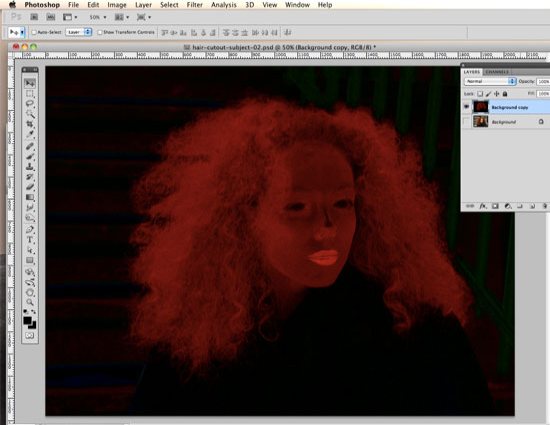
Duplicate the background layer again and merge with the Linear Burn layer
It's time for another background layer duplication... In the same way as before, make a copy of the background and merge it with the top 'Linear Burn' layer. Now the cleaning up process begins.
Use Levels to clarify the red
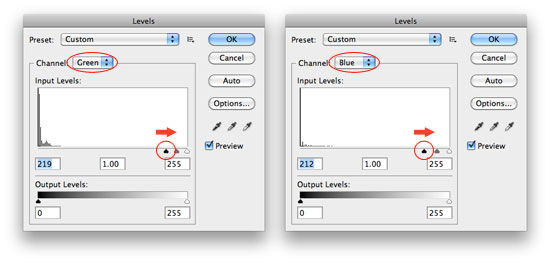
What we need to start doing now is lighten all the areas we want to keep and darken the areas we want to delete. Once this process is complete, we'll be creating a new Alpha Channel out of the result which (once cleaned up further) will become our mask. First we need to enhance the red to give us the best chance of picking out the finer details.
Click on the top layer and then select Levels (Image/Adjustments/Levels...). Because we're working in RGB Color Mode There'll be three colors shown in the Channels dropdown menu - Red, Green and Blue. With Red selected, drag the white slider to the left, up to where the histogram graph begins (below). This will brighten up all the red in the image, but make sure you don't take the slider too far, or the finer detail around the edges will start to disappear. Once you've done the Red, select the Blue channel and slide the black slider to the right; and then do the same for the Green. This will get rid of any unwanted detail in the background. It'll also get rid of any in the foreground, so this only applies to this particular image. If you're working on a different photo, play with the sliders until you get the best effect on the image you're working with.

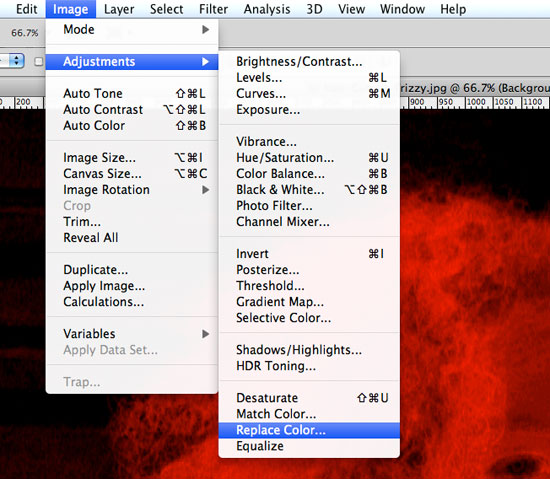
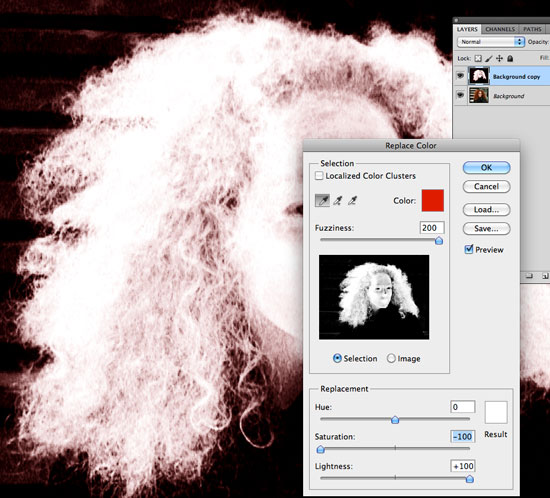
Use Replace Color to lighten the red
Next we're going to use the Replace Color option to replace the red with white (or light shades of red where detail exists). Select Image/Adjustments/Replace Color... (below). When the Replace Color dialogue panel appears, click the cursor (which is now an eye dropper) onto the part of the image from which you need to sample the color to replace.
In this case we need to select the brightest red so as to capture as much comparative hue as possible. When you're happy with the color you've selected, drag the Fuzziness & Lightness sliders up to the maximum, and the Saturation slider to the minimum. You'll end up with a more extreme negative image with lots of areas of light and dark.
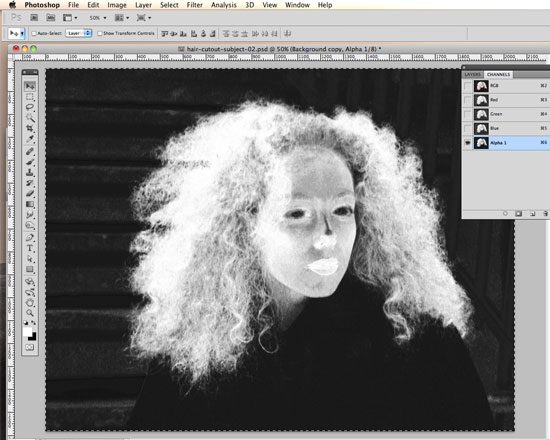
Select the top layer and copy it into a new channel
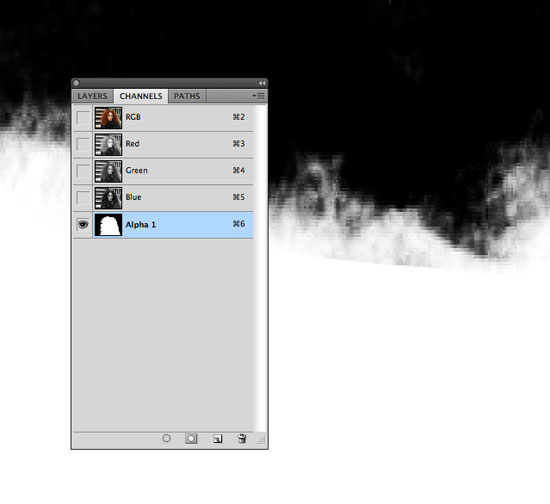
Now select the layer (Select/All) and copy it to the clipboard (Edit/Copy). Select the Channels palette, click the Create New Channel button at the bottom and select Edit/Paste. The layer from the clipboard will become monochromatic (below). Next we need to block out all the areas we want to delete and keep with solid white and black.
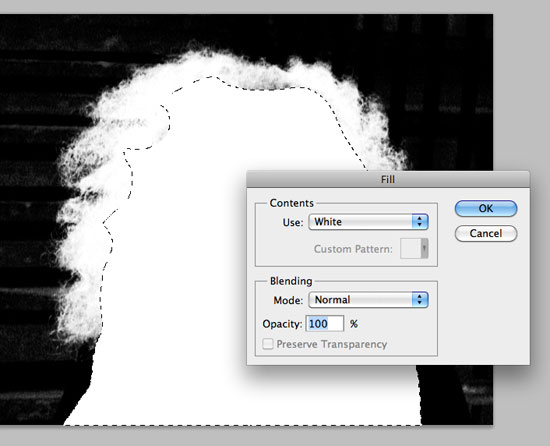
Block out areas of white and black and work on Levels and Replace Color until satisfied
This is the stage that will probably require most time and care. First use the Lasso Tool to roughly select definite solid areas - keep clear of any part of the image that blends in any way with the background, and fill it with white (below). Then do the same for the background - roughly select the background (steering clear of blending areas or fine hairs) and fill it with black.
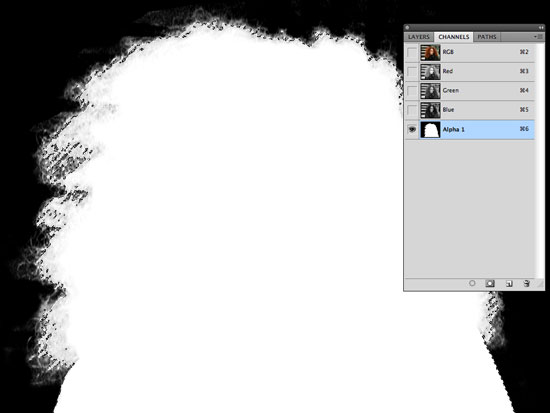
Once you've blocked in these rough areas you can continue to work on the channel with the photo showing through (below). To achieve this, first click on the RGB Channel at the top of the Channles palette. This will make the RGB channels visible but turnm off your Alpha 1 channel. Turn it on by clicking on the empty Indicates Channel Visibility checkbox to the left of the Alpha Channel.
Now return to the layers palette and make the background layer visible - and hide any layers above it. Your Alpha channel will now appear as a red mask around the photo, and you should be able to clearly see the previously dark edges of the model's shoulders against the background. Making sure the Alpha Channel is selected, and that the default foreground and background swatches in the Tool palette are set to black and white respectively, use the Brush Tool to add to the Alpha mask, and the Erase Tool to delete from it.
You can either brush/erase the mask from the shoulders and arms, or use the Pen Tool to create a path from which a more precise selection can be made. Either way, (and it's always easier to brush out areas if you have a tablet to work with), you need to work around the image to make as clean a mask as possible.
Once the clearly defined areas are taken care of (the arms/shoulders in this case) you can return to the mono channel (by clicking on the Alpha 1 Channel) to continue work on the finer details (below). Don't erase over any of the blending edges or fine hairs - instead, go as close as you dare to them with a soft airbrush or eraser to get rid of the sharp areas of white and dark.
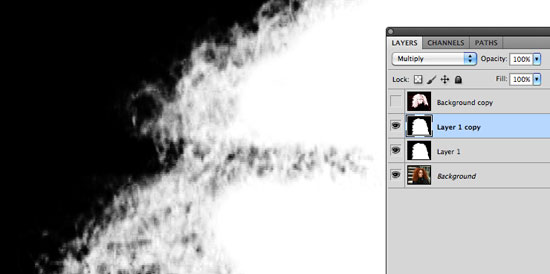
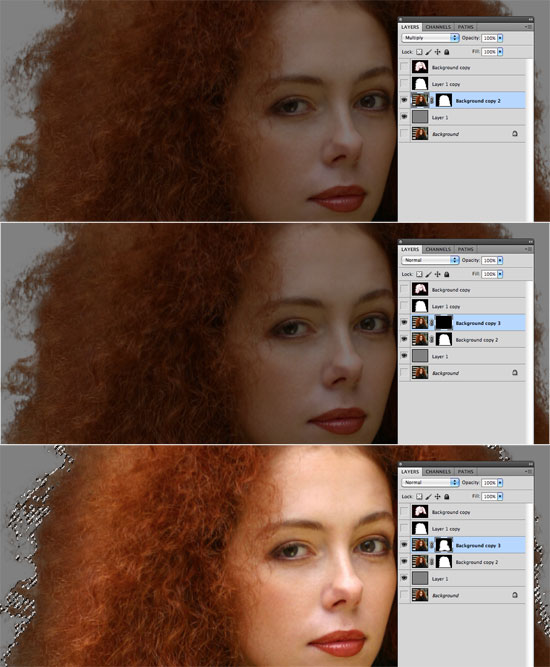
Select all, copy channel to a new layer, duplicate and multiply the top layer
We're going to reverse the process now and copy/paste our cleaned up channel to a new layer. The idea here is to get rid of any left-over grays in the background and to sharpen up the contrast of individual hairs. Unless the channel mask has a high contrast, the hair will end up inheriting a halo of whatever color(s) surrounded it from the original image. We can fix some of this in Photoshop, but better to take care of as much as possible at this stage.
Select All and Copy the Alpha Channel to the clipboard. Return to the Layers palette, click the Create a New Layer button, select the empty layer and paste your copied channel into it. Now duplicate that layer and select Multiply from the Blending Options dropdown menu. This will tighten up the contrast (below).
Merge the two mono layers, Select All, Copy, Create a New Channel and Paste as Alpha channel...
Select both the black & white layers, right-click on them and select Merge Layers. Then Select All and Copy, return to the Channels palette, create a new channel and paste the copied layer into it. Right-click (or Command-click on a Mac) on the Alpha channel thumbnail to make a selection (below).
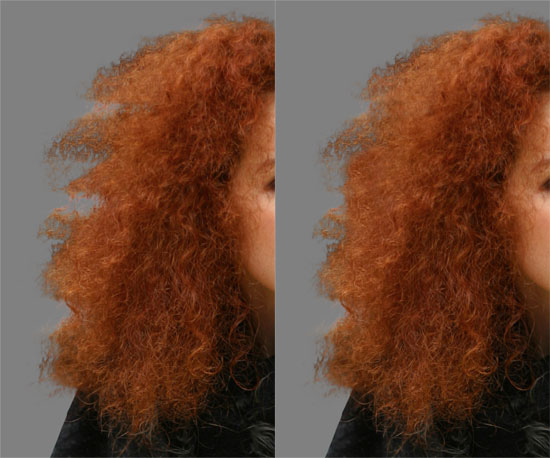
Create a layer mask on a new background copy
Return to the Layers palette and duplicate the background layer. Hide all layers except the background copy. Select the background copy and click the Add Layer Mask button at the bottom of the palette. You'll now get your first glimpse of your cutout (below).
Create a temporary plain gray or dark background to highlight problem areas. Use the Clone Tool to fix dropout areas.
Underneath the masked layer, create a new layer and fill it with 50% gray (Edit/Fill.../50% Gray). This will help us to clean up problem areas and easily see where the image needs more work. In the image on the left (below) you can see where the white lines from the steps jutted into the hair. To fix this the best thing would be to use the Clone Tool.
To achieve this, select the Clone Stamp Tool from the Tools palette. With the layer selected, Option-Click on an area of the hair that you want to copy and then (with a soft airbrush) paint over the gaps in the hair. Note: You will have to airbrush over the same areas with the layer mask selected in order to make the newly cloned areas visible. However, you'll need to be careful not to allow any of the background to appear around the finer detail.
Duplicate the masked layer and Multiply lower layer
In order to blend the edges of the hair into whatever background we decide to use, we're now going to multiply the active layer into the background and paint in areas of light within the edges (below). First select Multiply from the Blending Options dropdown. Next, duplicate the active layer and select Normal from the Blending Options dropdown for the uppermost layer.
With the upper layer's mask selected, Select/All and hit Delete (making sure that the default fore/background swatches in the Tools palette are applied). Now Command-Click the mask channel of the layer below to make a selection (this will stop you painting outside the boundaries of the cutout) and using a large, soft-edged brush, start painting in the image from the center outwards. Try to make the blend from light to dark as subtle as possible near the edges.
This procedure will make sure that no white halos are visible around the edges of the hair. Now it's time to insert a new background image.
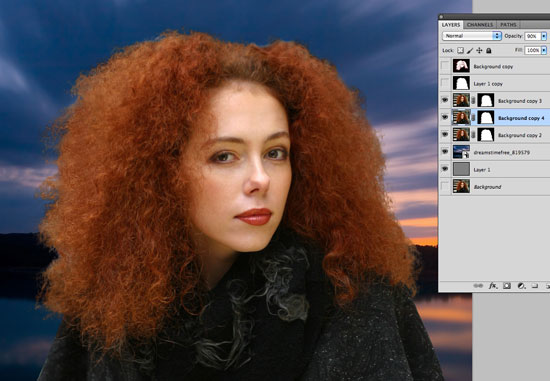
Bring in a new background of your choice
Click on the gray background layer to make it active. If your background is in a separate file, select File/Place, navigate to the image on your hard drive and click OK. This will create a new layer and place your background image behind your two masked layers. Scale the image to the desired size and press the Return key to commit the transform.
If the edges of the hair are too dark, try lowering the opacity of the bottom 'multiplied' layer, duplicating it and changing the Blending Option of the new middle layer to Normal. Then adjust the opacity of each of these two layers until you get your desired result (below).
How to Cut Out Hair in Photoshop - Tutorial
The Finished Image
How to Cut Out Hair in Photoshop - Tutorials
Below are all the tutorials I've created to demonstrate different ways to cut out hair using Photoshop:
Resources & More Information
- Photoshop Cutouts that Blend
- Return from How to Cut Out Hair in Photoshop to Home
- Free and Royalty Free Stock Images