How to Create and Apply Quark Style Sheets
Using Quark Style Sheets (click here for InDesign Style Sheets)
If you've ever had to format large amounts of text in Quark XPress and then had to change the font, colour, character size or leading of all of the headings or body text, you'll know how time consuming it can be. It takes ages to trawl through large documents changing the attributes for each bit of text. And it's also an unreliable way to work - things can be easily missed or overlooked.
It would be much better to be able to change all instances of a heading, caption or other text syle, all at the single click of a mouse. This is where Quark style sheets come in handy.
Our studio works on a lot of book design and page makeup for large publishing firms. Usually we put together a series of six (or so) books, varying in length from 32 to 64 pages. The text in these books has to be set up consistently throughout the series. If we didn't use pre-defined Quark style sheets (or InDesign style sheets) for this work we'd be in real trouble.
Quark Style Sheets
So how do you set up Quark Style Sheets? First, format some text.
It's very simple to set up text styles in both Quark XPress and InDesign. This article looks at Quark style sheets. Click here for an article focusing on InDesign style sheets. So, beginning with Quark style sheets, create a new document and flow some text into it. If you want some sample text to play with, go to the handy Lorem Ipsum website. Lorem Ipsum is the graphic design industry's standard dummy text, and has been since the 1500s, when a printer took a galley of type and scrambled it to make a type specimen book.
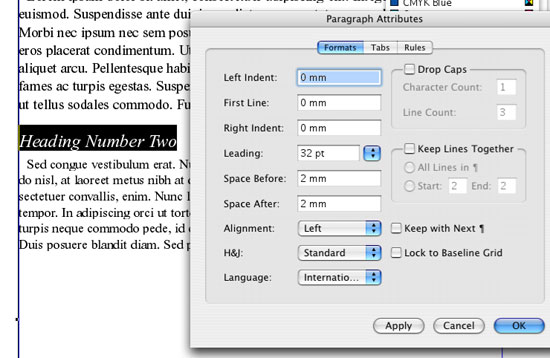
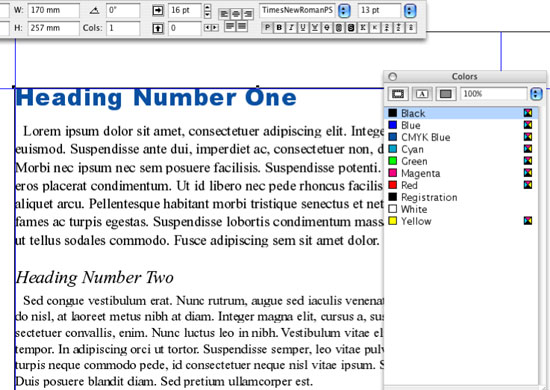
Create a couple of paragraphs and a heading or two and flow it into a Quark text box. Then format the text in any way you like. Don't worry about how good or bad it looks for now - just create two or three distinctly different text styles. You should be able to apply most attributes using the Measurements Palette (Window/Show Measurements), the Formats dialogue box (Style/Formats...) and the Color Palette (Window/Show Colors).
For example, create a heading (an A-Heading) with the following attributes:
- Font: Arial Black
- Size: 24pt
- Leading: 32pt
- Space After: 4mm (find this in Formats - Style/Formats...)
- Color: Blue (C100 M50 Y0 K0 - create a new color via Edit/Colors)
Next, format a block of text beneath it (this will be 'body copy') with the following attributes:
- Font: Times New Roman
- Size: 14pt
- Leading: 18pt
- Indent: First line 3mm (find this in Formats - Style/Formats...)
- Color: Black
Now format a second heading - a 'B Heading':
- Font: Times New Roman Italic (don't use 'faux' bold)
- Size: 18pt
- Leading: 32pt
- Space Before: 2mm
- Space After: 2mm
- Color: Black
Quick tip - never use the 'faux' bold or italic options in the Measurements Palette. Always use the font's own built-in style. If it doesn't have the one you want you may be forced to fake it with Quark's native styles, but if you do, check and double check that it comes out OK in the press-ready document and printed proofs.
Finally format a second block of text to run after the B-Head:
- Font: Times New Roman
- Size: 13pt
- Leading: 16pt
- Indent: First line 3mm (find this in Formats - Style/Formats...)
- Color: Black
You should end up with something like this:
Quark Style Sheets
Now to set up the Paragraph Styles
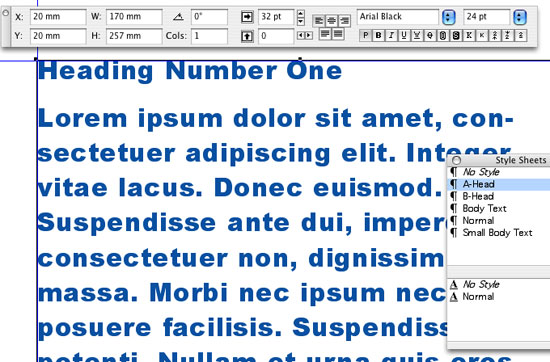
Click anywhere within the A-Heading. Open the Quark style sheets editing dialogue box by selecting Edit/Style Sheets... You should see two default styles listed: Normal (paragraph style) and Normal (character style). The first has a little 'paragraph break' symbol on its left. The second has a 'character' symbol next to it that's an underlined upper case 'A'.
Paragraph styles affect entire paragraphs of text, whilst character styles affect individual characters or selected areas of text. For example, you may want to apply a paragraph style to a block of text and make it Times New Roman, but within it there need to be a couple of bold words. These would have a 'bold' character style applied to them. We'll look at character styles in more detail in a moment. Just make sure you always set up the paragraph styles before the character styles.
Now click the New button at the bottom of the dialogue box window. It will expand to reveal 'Paragraph...' and 'Character...'.
Select 'Paragraph...' and give it the name 'A-Head' or similar. You need to give it a name that will make sense to you, so that once the style sheets palette is bursting at the seams with styles you can easily find the one you want.
In the Quark style sheets palette, if you click the General, Formats, Tabs, Rules buttons you'll see that the style has automatically inherited the attributes of the text where you placed the cursor. You don't need to make any other changes. To double check that the attributes are correct, look at the Description under the General tab - this details all the attributes.
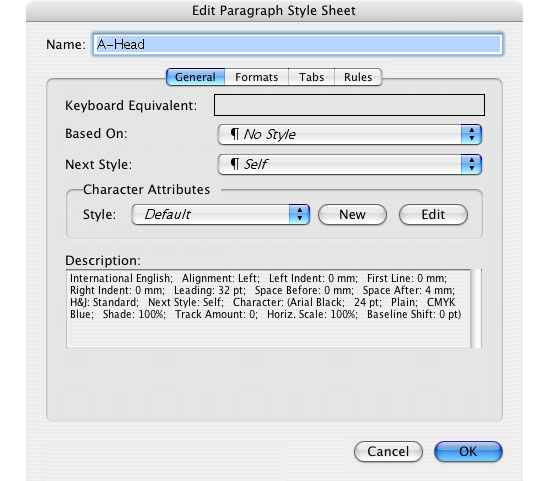
Happy? Click OK and you've just made your first style. Now repeat the process with the other three styles, calling them 'Body Text', 'B-Head' and 'Small Body Text'.
Quark Style Sheets
How to apply the Paragraph Styles to the text
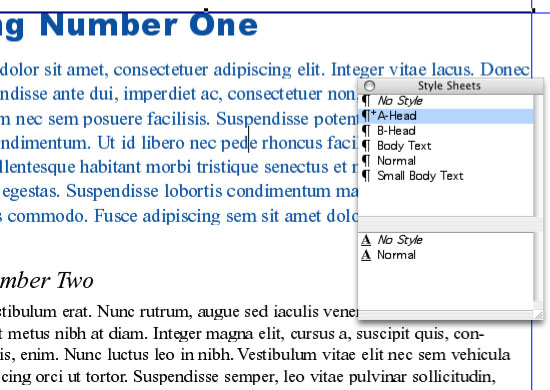
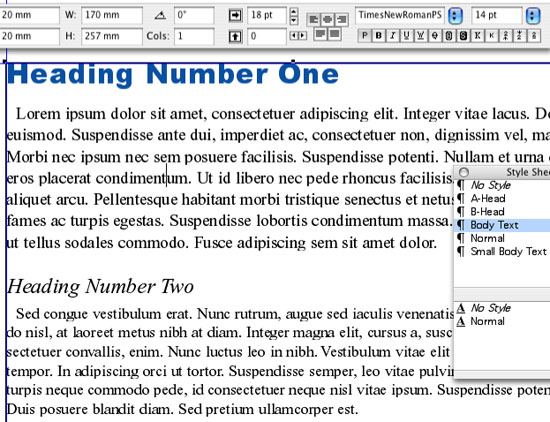
Open the Style Sheets Palette (Window/Show Style Sheets). You'll see the paragraph styles appear at the top of the window. The character styles appear at the bottom (we haven't created any of those yet). If you click the cursor anywhere within the first block of body text you'll see the paragraph style 'Normal' selected, with a little '+' next to it. This means that the text has attributes other than those of the style applied to it.
As a test, click on the 'A-Head' style - and you'll see that some of the new attributes are applied to the text, but not all. (it just turns blue, but retains the original size and font:
Quark Style Sheets
Applying a clean paragraph style: method 1
In order to apply a completely clean paragraph style to a block of text, there are two methods. The first is to press the ALT key and click on a style of your choice. This will clear the entire paragraph of all other styles (including character styles) and apply the style you click on. For example, let's select that first block of body text and apply the A-Head style to it whilst pressing the ALT key:
Now the whole paragraph changes to the A-Head style and the '+' disappears from the style sheet palette. This works fine, but youll have to do the same thing to every other block of text, unless you select all copy and then ALT/Click a style.
Quark Style Sheets
Applying a clean paragraph style: method 2a
When I'm applying paragraph styles to text for the first time, I prefer to select all text and then apply the "No Style" option to everything (this is found at the top of the style sheet palette window). This clears all Normal and other paragraph styles (but not character styles) from the text without actually changing any of its attributes.
If it was 12 point before, it will remain 12 point. It just becomes more receptive to any new styles that you want to apply. If you want to clear all character styles as well, click the No Style option at the top of the character styles pane, so that when all text has been selected, both the paragraph style pane and the bottom character style pane show No Style.
For example, I'll now select all the text I've just created and select the top (paragraph) No Style. I'll also click the lower (character) No Style. I can now click the cursor in each block of text as I work down the document and then click on the paragraph style of my choice from the style sheets palette. No '+' symbol will appear next to any style names as you go - I find this by far the cleanest and most reliable way of working.
Quark Style Sheets
Applying a clean paragraph style: method 2b
I take this a step further by asking myself: "What's the most commonly recurring text style in this document?". It's almost always the Body Text style. So why not save yourself a pile of work by applying the Body Text style to the entire text? Once all text has the Body Text paragraph style applied to it, you can skip those blocks of text as you trawl through the copy applying the other paragraph styles. This means you'll be confident in the consistency of the text styles.
Quark Style Sheets
Now to set up the Character Styles
So you've now gone through your entire document and applied your paragraph styles. Now you need to apply your character styles. This means you'll make individual words and phrases bold, italic, underlined, or whatever they need to be. Remember, character styles only affect the text you have actually selected. Paragraph styles affect entire blocks of text.
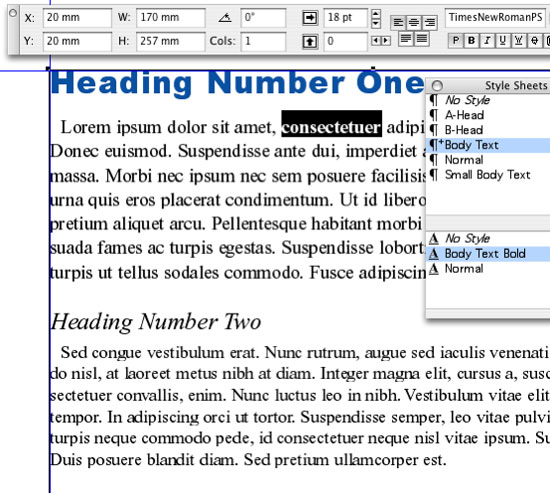
To create your character styles, select a word from the first block of Body Text. Change its font to Times New Roman Bold. You'll immediately notice that a '+' has appeared next to the Body Text style in the style sheets palette, meaning that the text now has other attributes other than the applied paragraph style.
With the word still selected, select Edit/Style Sheets... to open the style sheets dialogue box. Select New/Character... This will open the character style sheet attributes window. It inherits the attributes from the selected text, so you just need to give it a name. Let's call it Body Text Bold.
Click OK and then select Save. A new character style will appear in the lower pane of the style sheets palette called Body Text Bold. You'll still need to apply this character style to the selected text - so click on the style, and that's that! You now have a Body Text style applied to the paragraph, and a Body Text Bold character style applied to a word within the same paragraph.
Quark Style Sheets
What's the point of setting up style sheets?
There are lots of great reasons for using Quark style sheets - the two most compelling reasons are:
- So that you can be confident there's consistency of font, text size, leading etc across an entire document.
- Secondly, if a heading font, size or other attribute needs to be changed after a document has been set up, (for example the A-Head we just created), instead of changing every single instance of it throughout the text, you just change the attributes of the style which is applied to it.
- Just select Edit/Style Sheets... then select the A-Head style.
- Click Edit, and alter the style in any way you want by clicking through the General, Formats, Tabs & Rules tabs in Edit Paragraph Style Sheet dialogue box.
- Once you'll made you changes, click OK, then Save. Every instance of the A-Head will change simultaneously.
Click here for an InDesign Style Sheet Tutorial
Resources & More Information
- Photoshop Clipping Paths
- Free Method of Converting Quark to InDesign
- 4 Color Process Printing and Spot Color Printing - What's the Difference?
- Return from Quark Style Sheets to Home