How to Create a Gel or Glass Photoshop Button Effect
Photoshop Tutorial Glass Photoshop
A basic Photoshop layer style tutorial
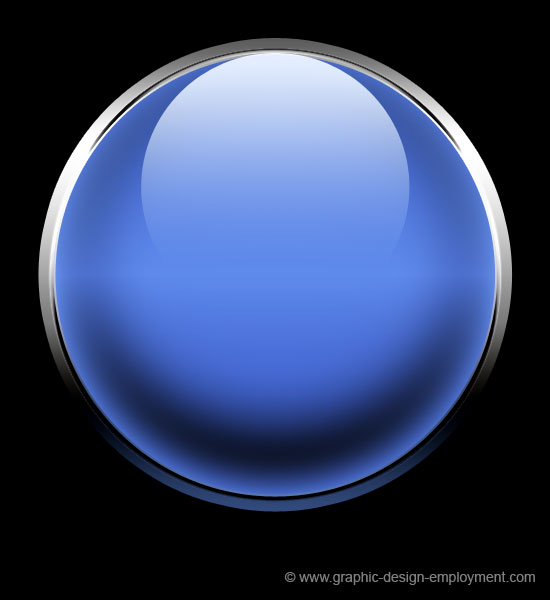
One of the most commonly requested Adobe Photoshop CC tutorials is the one which shows how to create a glassy sphere or button. Never one to take a back seat, I thought I'd throw my basic Photoshop version into the mix! This is a tutorial showing how to create a glass Photoshop button set into a metallic base. The Photoshop file uses three flat shape layers with layer styles applied.
![]()
Because the effect has been created using Photoshop vector tools, the layered document can be increased to any size without loss of quality. Creating non-destructive layered documents with shape layers, adjustment layers and layer styles is a great way to discover the hidden depths of Photoshop's power and versatility, and makes it possible to edit the file later with ease.
So how was it created? You can either read on, or view the Photoshop video tutorial below.
Photoshop Tutorial Glass Photoshop
Photoshop Video Tutorial
Photoshop Tutorial Glass Photoshop
Create the document and shape layers
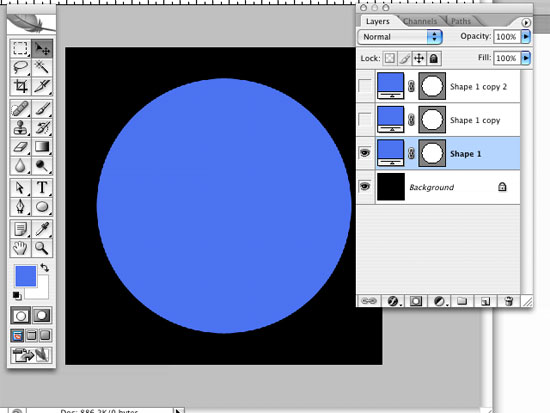
To begin, create a Photoshop document 550 pixels square. Fill the background with black. Select the Elipse tool and make sure the Shape Layers button is selected in the Options palette, rather than the empty Paths option.
While holding down the shift key, create a perfect circle on the canvas, leaving a comfortable amount of space around the edges. Since our button's going to be blue, double-click the color swatch on the new shape layer (in the layers palette) and select a light blue (R76 G115 B241). Obviously you can choose your own color if you don't like this one!
To centre the circle within your canvas, select the Move Tool, select all and click on the Align Horizontal Centers and Align Vertical Centers buttons in the Options palette. Now duplicate the shape layer twice by dragging it over the Create a New Layer button at the bottom of the layers palette, and then once again to create a third layer. When you have a black background and three blue, centred, circular shape layers, hide the top two layers, select the bottom (visible) shape layer and move on to the next stage.
![]()
Photoshop Tutorial Glass Photoshop
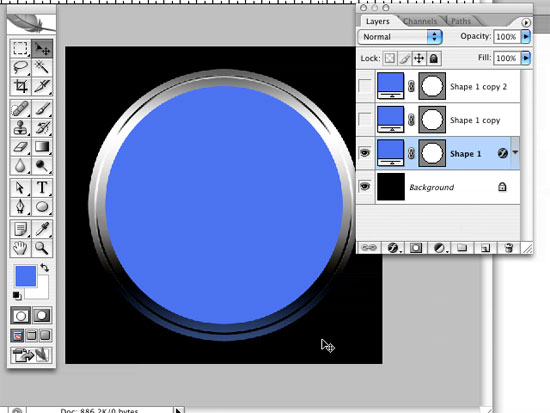
Create the metal effect button base
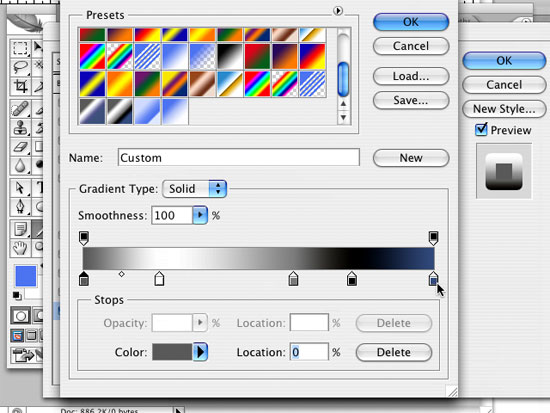
Click the Layer Styles button at the bottom of the layers palette and select Stroke (which will become the metal base). Enter values shown here: (where settings have been ignored, leave them at their default values)
- Size: 30
- Position: Center
- Fill Type: Gradient
- Style: Linear
- Angle: -90 degrees
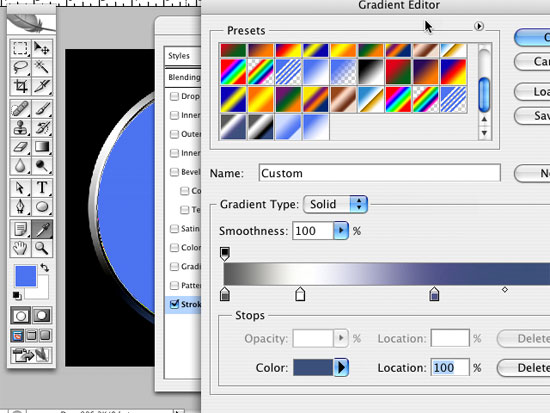
Click on the Gradient bar to open the Gradient Editor and create a new gradient like the one shown below. To add new points, just click below the gradient bar. A swatch point will appear which you can click on to edit. Play around with the gradient until you're happy. Click OK on the Gradient Editor.
![]()
Select Bevel and Emboss and enter the following values, remembering to leave as default any settings not mentioned here. This will create a groove within which the glass button will sit:
- Style: Outer Bevel
- Depth: 190%
- Direction: Up
- Size: 6 pixels
- Uncheck 'Use Global Light'
- Angle: 90 degrees
- Altitude: 15 degrees
- Click the Gloss Contour thumbnail and select 'Ring'
- Highlight Opacity: 100%
- Shadow Mode Opacity: 100%
![]()
Photoshop Tutorial Glass Photoshop
Create the glass Photoshop button
Make the middle shape layer visible. With the middle shape layer selected, click the Layer Style button and choose Stroke from the popup menu. Enter these values to give the button a light outline which will look like a reflective edge around the circumference:
- Size: 2
- Position: Inside
- Blend Mode: Screen
- Opacity: 90%
- Fill Type: Gradient
- Style: Linear
- Angle: -90 degrees
Click on the Gradient bar to open the Gradient Editor and create a new gradient like the one shown below. Once again, it's your button, so play around with the gradient until you're happy. Click OK on the Gradient Editor when done.
![]()
To add some reflected shadow (remember it's in a black environment) select Gradient Overlay. Select a standard black-to-white linear gradient with:
- Opacity: 50%
- Blend Mode: Multiply
- Angle: 90 degrees
Now for some reflected light - select the Inner Glow Layer Style and give it the following attributes using a light blue-to-transparent gradient:
- Blend Mode: Screen
- Opacity: 75%
- Source: Edge
- Choke: 0%
- Size: 60 pixels
- Range: 50%
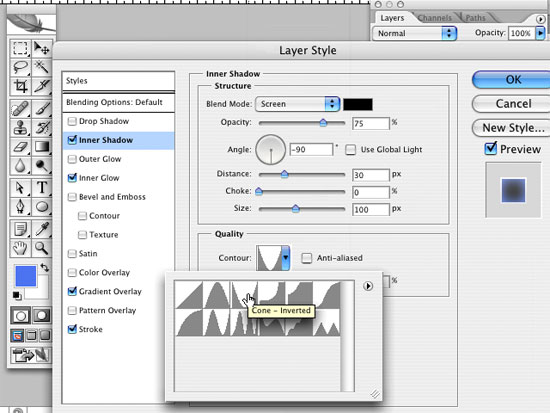
To highlight the shadow at the base of the button we can take the optional step of adding a central inner shadow with these values:
- Blend Mode: Screen
- Opacity: 75%
- Angle: -90
- Distance: 30
- Choke: 0%
- Size: 100 pixels
- Contour thumbnail: Cone - Inverted
![]()
![]()
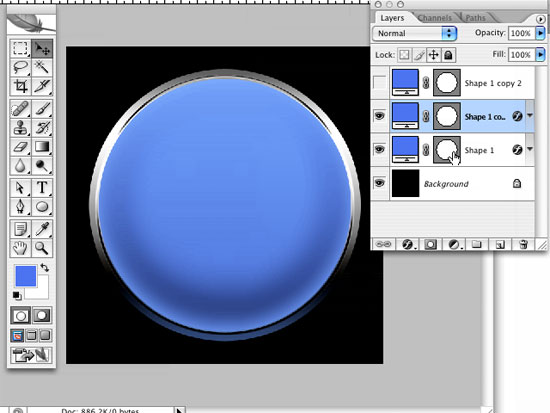
When you're finished with this task, click OK and move onto the next (and final) stage.
Photoshop Tutorial Glass Photoshop
Create the reflection
To create the reflection at the top of the button we need to make the final (uppermost) shape layer visible. Select the layer. Select the Move Tool. Make sure that 'Snap to Layers' is active (View/Snap To/Layers) and drag a guide down to snap to the top of the circle.
Now go Edit/Free Transform Path and with the SHIFT and ALT keys held down, reduce the size of the path by about 60%. The SHIFT key constrains the proportions of the scale and also snaps any movement to one axis. The ALT or OPTION key keeps the transformation centred.
Now release ALT, keep SHIFT depressed and drag the circle up until it snaps to the guide at the top. Press RETURN to Commit Transform. Set the blending mode for the layer to Screen.
To give the lightness of the relection a boost, select Gradient Overlay and create a standard blue-to-white linear gradient as shown. Use these settings:
- Blend Mode: Screen
- Opacity: 80%
![]()
Photoshop Tutorial Glass Photoshop
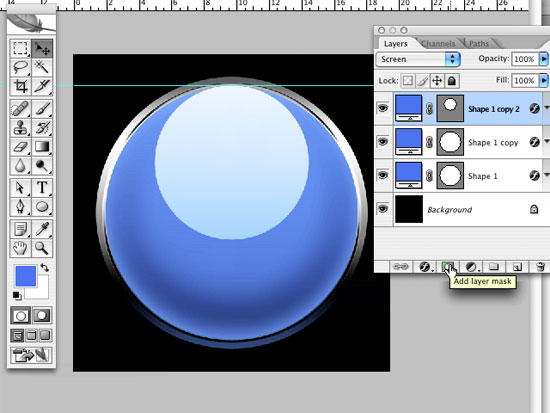
Only one thing left to do! Add a layer mask
With the top shape layer still selected, click Add a Layer Mask (found at the bottom of the layers palette). A plain white thumbnail will appear on the layer in between the color swatch and vector mask. Make sure it's selected.
Click the little Default Foreground and Background Colors icon at the bottom of the main Tool palette. Then select the (linear) gradient tool. Position the cursor just below the top of the small shape layer circle, hold down the SHIFT key to constrain to the Y axis and drag down to just above the bottom of the circle.
![]()
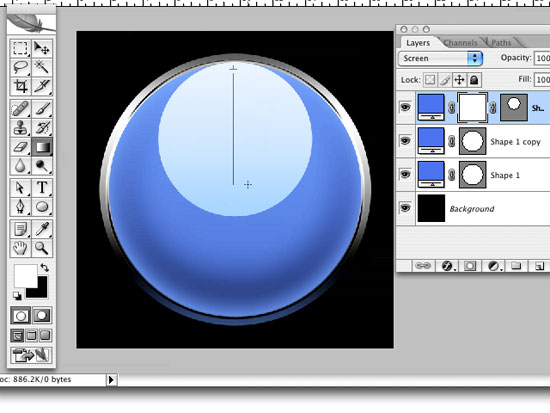
The elipse should now blend in seamlessly with the layer beneath, creating a nice glassy reflection. Try redoing this gradient mask a few times until you're happy.
Now you should have a lovely glassy button!
Photoshop Tutorial Glass Photoshop
Optional step - Add more depth
If you'd like to take the reflected shadow a little further, there's a nice little extra you can throw in. Select the middle shape layer and click the layer styles button. Select Satin. Enter the following values:
![]()
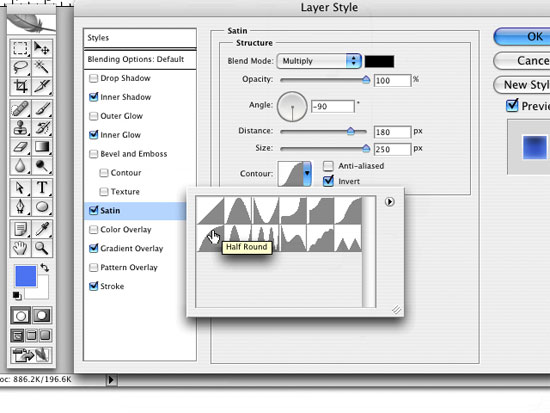
- Blend Mode: Multiply
- Color: Black
- Opacity: 100%
- Angle: -90 degrees
- Distance: 180 pixels
- Size: 250 pixels
- Contour: Half Round
- Invert: Unchecked
![]()
And you'll end up with something a little darker and richer. Enjoy!
Resources & More Information
- Bling Text Tutorial
- Photoshop Clipping Paths
- Free Method of Converting Quark to InDesign
- 4 Color Process Printing and Spot Color Printing - What's the Difference?
- Return from Glass Photoshop Tutorial to Home