How to Change Document Size in Illustrator
If you need to know how to change document size in Illustrator, you first need to check what version of Adobe Illustrator you’re using. Back in the days of Illustrator CS3 (and earlier), changing the document size was a pretty simple task, carried out in the same intuitive way common as in many other applications.
However, in Illustrator CS4, the concept of Multiple Artboards was introduced, meaning that just a single document settings dialogue box was no longer enough to cope.
How to Change Document Size in Illustrator CS3 and Earlier
To create a document in Illustrator CS3 (and earlier) you select File/New... This opens a dialogue box that enables you to enter the values for a single page size.
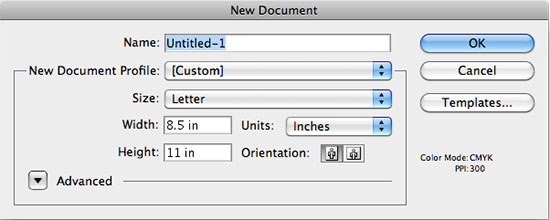
Illustrator CS3 and its previous incarnations also allowed document size to be changed simply by providing a dialogue box into which the user entered the new values, just like so many other layout programs. These settings are accessible by selecting File/Document Setup...
A dialogue box will appear that enables you to either select a preset standard page size, or enter your own values. Here you can also select landscape or portrait format. Once you’ve entered your desired values, click OK and the document size will change accordingly.
Enter Illustrator CS4 (and beyond)...
How to Change Document Size in Illustrator CS4 and Later
All this changed in Illustrator CS4. In the new version, multiple artboards were introduced, allowing the user to create up to 100 working pages, all visible in a single document layout. This meant that a single page size dialogue box just wasn’t enough for the job of resizing several different page sizes.
This means that even if you are only working with a single artboard (which most users will probably do initially), the process of altering the page size is completely changed. The demonstration images shown below were created using Illustrator CS6, but the options are the same for CS5 and CS4.
To create the document in the first place, everything as it should be. You just select File/New... There's a subtle but powerful change in the dialogue box when compared to the older CS3 options. There’s now a ‘Number of Artboards’ heading followed by a numeric field which, in turn, is followed by five little layout control buttons. These are grayed out until a multiple number is entered into the numeric field.

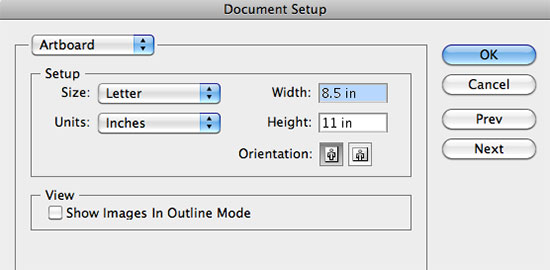
For now though, we’ll just create a single artboard. Once your page has been created, let’s resize it. Select File/Document Setup...
Immediately obvious by their absence are any fields for entering new values, or any aspect ratio icons for portrait and landscape. Also, the dialogue box looks much larger than it does in CS3. This is because the Transparency and Type Options are no longer hidden by a dropdown menu. The Artboards option has changed to Bleed and View Options, and also new is a button in the top right corner of this area called Edit Artboards. This is what we’re looking for.
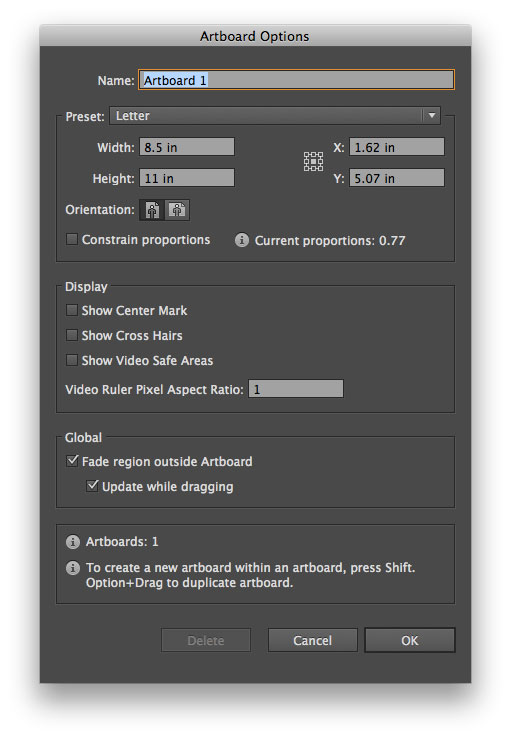
Click the Edit Artboards button. We now have a few ways of changing the page size.
- The simplest thing to do now is press the ENTER key on your keyboard. This will bring up the familiar Artboard Options dialogue box that we’ve been searching for. Enter your revised values and select your required aspect ratio (portrait or landscape) here and click enter. This will change the size of your page to whatever you desire.
- Another way to change the document size is to drag the handles that show in the corners and the sides of the artboard page. Once you’ve done this, pressing the ESCAPE key on your keyboard will commit the changes.
- A third way to change the document size is to enter the values into the Artboard Options bar at the top of the screen. This contains the same numeric value fields and portrait / landscape buttons as the Artboard Options. Once you’ve set the correct values, press ESCAPE or click on one of the tools in the Tool Bar to commit the changes.
Create and Edit Multiple Artboards in Illustrator
Of course, the whole point of this major change in how to change document size in Illustrator was to enable users to create multiple artboards and resize them independently of each other. You can test this feature by creating a new document in Illustrator and entering, say, 4 artboards into the Number of Artboards input field.
Select one of the Grid by Column, Grid by Row, Arrange by Row or Arrange by Column buttons (all of whose layout arrangements can be reversed by clicking the Change to Right-to-Left Layout button). Click OK.

How to Change Document Size in Illustrator for Multiple Artboards
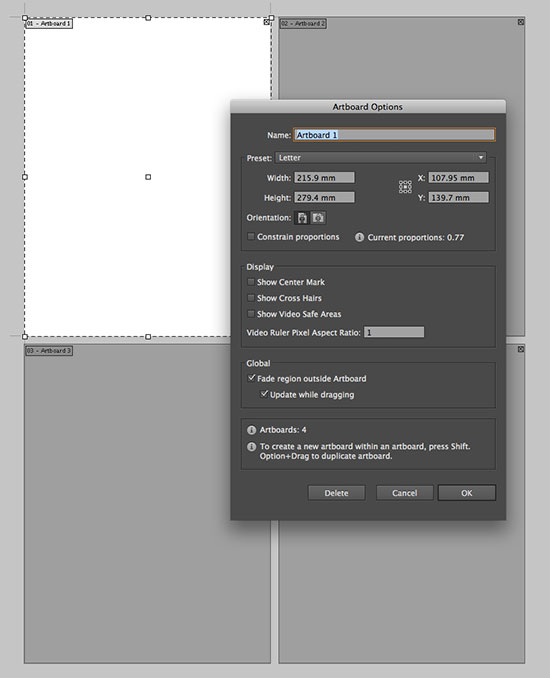
This will result in a new document containing four pages, laid out in the way you specified. Each of these pages (artboards) can be changed to different sizes. To do this, select File/Document Size... and click the Edit Artboards button again.

Whichever artboard is selected will show an active dotted line around it with handles for resizing. You can change the active artboard by clicking on another and entering different settings for each one in the same way as explained earlier.
You can also add new artboards when in the Edit Artboards mode by simple dragging the cursor anywhere on the pasteboard, even over existing artboards. Commit the changes as before by either clicking a tool in the Tool Bar or by hitting ESCAPE.

There are many benefits to using multiple artboards in Illustrator. In our studio, for example, when creating a number of visuals for logo designs, we used to either work on the designs in different documents, or (more likely) place them in different layers, turning their visibility on and off as required.
Now, we can put any number (or at least any number up to 100) of visuals in a single document and be able to compare them side-by-side, without having to put them all on the same cluttered page. We can also print or export the document as a PDF with each artboard automatically treated as a different page. Handy.
Resources & More Information
- Illustrator Live Trace
- Illustrator How to Create a Logo
- Illustrator How to Make a Pattern
- Illustrator How to Convert Text to Outlines
- Illustrator How to Create Line Art
- Illustrator How to Make a Triangle
- Illustrator How to Cut a Shape
- Click to go to top of How to Change Document Size in Illustrator