Illustrator How to Make a Triangle
The most basic building blocks in Adobe Illustrator are polygons. To demonstrate in Illustrator how to make a triangle (the most primitive polygon), the fastest and simplest place to start will be the Polygon Tool in the main Tool Bar. Using the Polygon Tool certainly isn’t the only way of making a triangle, but it’s the most logical place to begin. This article has been written with the aid of Adobe Illustrator CS6, but the steps are the same no matter what version you're using.Illustrator: How to Make a Triangle - Tutorial by Nick Beresford Davies

Using the Polygon Tool to Make a Triangle
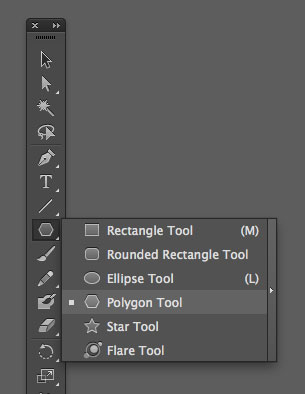
If you click on the Polygon Tool a popup menu will appear showing:
- Rectangle Tool
- Rounded Rectangle Tool
- Elipse Tool
- Polygon Tool
- Star Tool
- Flare Tool
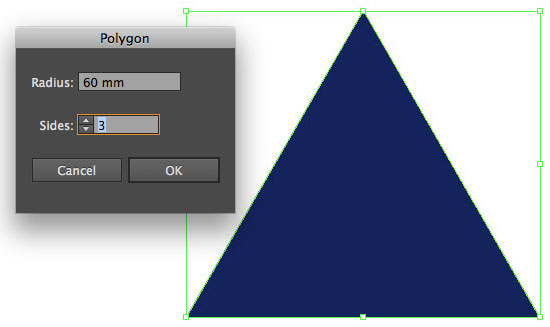
Select the Polygon Tool. If you want to start with a Triangle, click once on the artboard where you want the shape to appear. A dialogue box will appear asking what radius you want the shape to be and how many sides you want it to have. You can’t go lower than 3, so enter 3 sides with a 60mm radius and click OK.
A triangle will appear.
Illustrator will remember the last settings you entered, so if you want to make another triangle, perhaps at a different angle, drag the cursor across the art board (still with the Polygon Tool selected) and you’ll see the shape of a triangle appear and rotate as you drag your cursor around the screen. The width and height of the shape will change as you alter the scale of the triangle. Release to commit the shape.
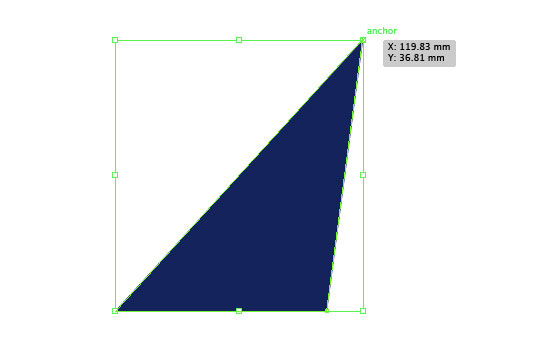
By default the triangle will be created from the shape’s centre. If you would like the point of origin to be different, with the triangle you just created selected, and with the Polygon Tool still active, go to the Illustrator Control Bar at the top of the screen - Window/Control. Here you’ll see a little square reference point wireframe with nine little handles evenly spread around its edges and in the centre.
![]()
The centre handle will be selected if the triangle is being created from a central point of origin. Click one of the other little handles to change the reference point of origin and drag / create a new triangle. This time it'll be created from a different reference point.
If you’d like the triangle to be constrained to an axis when you create it in this way, press the SHIFT key when you drag / create it and it'll snap to the x-axis.
Equilateral triangles
Creating a triangle using the above methods will always result in an Equilateral triangle (with all sides of equal length and all three angles at 60°).
Isosceles triangles
If you’d like to scale the size of the triangle, simply select the black pointer Selection Tool, select the triangle, hold down the SHIFT key and drag one of the handles of the bounding box, thus changing the size of the shape to the required size. If you’d like to convert the shape to that of an Isosceles triangle (two of the sides remain equal), release the SHIFT key when re-sizing.
Scalene triangles
If you’d like to convert the triangle to a Scalene triangle (with all sides and angles different), choose the white pointer Direct Selection Tool. Select one of the three points of the triangle and drag it in any direction you desire. This'll make the sides and angles uneven.
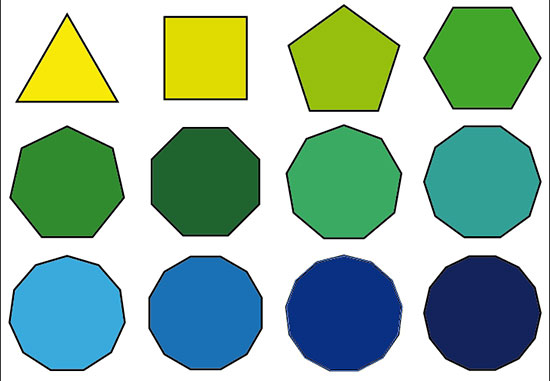
The Polygon Tool can be used to make a shape with any number of sides you desire - not just triangles. If you follow the same steps above and just increase the number of sides required, you’ll create polygons with different attributes.
Illustrator How to Make a Triangle Using the Pen Tool
There are many ways to skin a cat, and many ways to create a triangle in Illustrator. Another way is to use the Pen Tool and create the shape by clicking on the art board four times. The first three clicks create the first three points, and the fourth click closes the shape if you click on the first point created.

Alternatively you could create the three points and then select the two open endpoints using the Direct Selection Tool. Object/Path/Join (Control J) will close the shape.
If you hold down the SHIFT key whilst creating the triangle in this way, the angles of the sides will be constrained to 45° increments.
Illustrator How to Make a Triangle out of a Square
Yet another way to create a triangle in Illustrator is to first create a square or rectangle by using the Rectangle Tool (found in the same sublist as the Polygon Tool on the Tool Bar). Drag on the art board to create a rectangle, or SHIFT drag to create a perfect square.
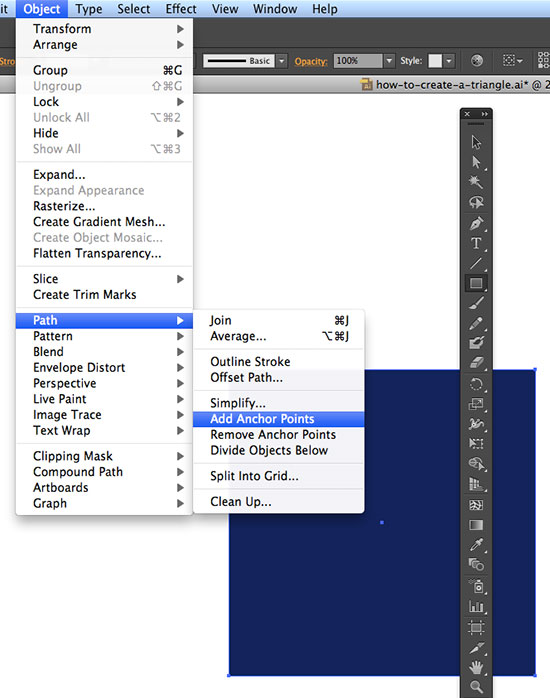
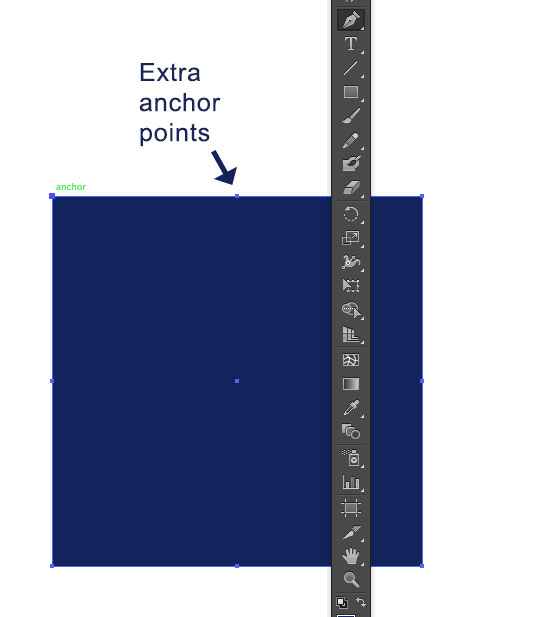
Next, with the square / rectangle selected, go to Object/Path/Add Anchor Points. Four new anchor points will appear on the shape, positioned precisely half way between the existing corner anchor points.
Now choose the Pen Tool and hover over the top left corner until a little ‘-’ symbol appears next to the Pen icon. Click when you see this and the top left corner anchor will be deleted. Repeat this for the new anchor point half way down the left side, then the top right, then the middle right.
Once these four anchor points have been deleted you’ll have your new Isosceles triangle, although you’ll probably want to delete the final dividing anchor point on the bottom middle edge in order to get unbroken sides all round. You can now edit this triangle in the same way as any created by other means.
Resources & More Information
- Illustrator Live Trace
- Illustrator How to Create a Logo
- Illustrator How to Make a Pattern
- Illustrator How to Convert Text to Outlines
- Illustrator How to Create Line Art
- Click to go to top of Illustrator How to Make a Triangle