The Basics or Proofreading in Graphic Design and Universal Proofreading Symbols
Why learn universal proofreading symbols?
One of the first things I had to learn when embarking on my graphic design career was how to proofread, and how to interpret universal proofreading symbols. Much of the work I was involved with when I started out (and still am today) was book design and page makeup. I would lay the books out, print hard copies for the editor and proofreader, and they would return the proofs to me 'dripping with ink'.
In the publishing world, enormous numbers of textual and layout alterations are made, often by more than one person on the same proofs. The editor might make their proofreading marks, followed by the proofreader, followed by the author... and so on. By the time the proofs get back to the designer they often need a total re-design - usually because authors and editors tend to write and re-write as they go!
Universal proofreading symbols make it possible for the graphic designer to understand exactly what changes need to be made, no matter how many different people have worked on a set of proofs, all with different handwriting and often from different countries.
If you have ever tried to mark up a closely typed piece of text with corrections, you'll know that it can get pretty messy, very quickly. Often the page ends up with long arrows pointing to a possible insertion point, showing where reworked text should go. It only takes two or three of these sort of corrections before the page becomes utterly unintelligible.
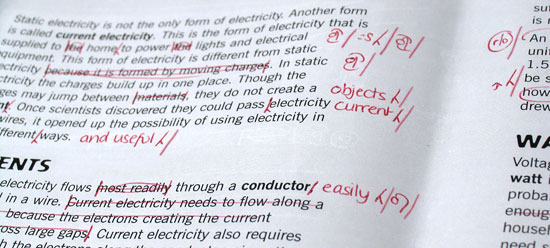
By using universal proofreading symbols and a pre-determined method of displaying them, any number of textual corrections become a piece of cake. Below is a great example of a couple of neatly marked-up passages to demonstrate just some of the most common proofreading marks.
If you would like to see some of the commonest universal proofreading symbols, take a look at our proofreading marks chart.
Proofreading basics
As a graphic designer, you'll find that your main involvement in proofreading will be in inteterpreting and implementing, rather than actually proofreading documents. I underwent a proofreading correspondence course which helped me get off on the right foot, but that won't be necessary if you're just interpreting. You just need to understand how the system works, and what the universal proofreading symbols actually mean.
If you look at the example above, you'll see that the proofreader has made simple marks within the text, and written the proofreading marks in the margin. That's basically all there is to it. You'll notice that there is a forward slash "/" following each instruction in the margin. This means that the correction is concluded. Take a look at our proofreading marks chart to familiarise yourself with the symbols, then look at the passage again. Things will start to make sense very quickly.
When you make a correction, you put the appropriate mark in the text (such as an insertion symbol) and then expand on your correction in the margin nearest the mark. For example, if the correction is nearer the left of the paragraph than the right, then the explanatory proofreading symbol goes in the left margin, followed by a forward slash to conclude the amendment.
You can put symbols in the right margin as well if the corrections are nearer the right of the paragraph than the left. Or you can put all corrections for a line in the same margin - it just depends how much space you have to play with.
Example
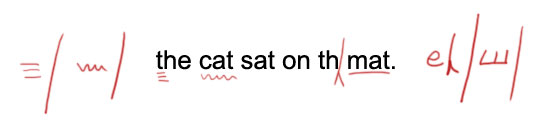
Let's say you wanted to correct the following sentence:
"The cat sat on th mat."
We need to add an 'e' to 'th'. And let's say we wanted to make the 't' of the first 'the' an upper case 'T', the word 'cat' bold and the word 'mat' italic. We would mark it up like this:
And this is what the end result would look like:

From the above example you'll already have learnt the universal proofreading symbols (from left to right) of make upper case, make bold, insert new matter and make italic. You're well on your way!
Proofreading takes practice, experience and a good eye for detail, but it's not as complicated as it first looks. Learn the symbols (you'll learn lots of them as you go) and practice. Our proofreading marks chart will give you a push in the right direction, but if you want a more thorough proofreading lesson, I can enthusiastically recommend the Writers and Artists Yearbook. You'll find an excellent few pages under the Resources for Writers section which shows all the universal proofreading symbols in detail, as well as a great example of a heavily proof-read block of text (before and after, with all proofreading marks clearly shown). It'll also tell you where to find freelance proofreading work. We always have a copy around the studio - very handy!
Resources & More Information
- Universal Proofreading Marks
- Download free PDF Cheat Sheet
- Return from Universal Proofreading Symbols to Home